Configure access requests
Set who can request access
ConductorOne has two methods to help you organize and control which apps and entitlements your colleagues can see and request.
| Method | Best for |
|---|---|
| Standard audience | Quickly making select entitlements in an app requestable. |
| Access profiles | Tailoring collections of entitlements for specific jobs, departments, or access levels. |
Set the standard audience for an app and select requestable entitlements
A Super Admin or an application owner with the Application Admin role in ConductorOne must complete this task.
Setting an app’s standard audience is the quickest way to make select entitlements in the app available for access requests. The standard audience for an app can be:
- Everyone in your organization
- Members of the specific groups you select
- No one
To set the standard audience for the app:
Navigate to Admin > Applications.
On the Managed apps tab, select an application.
Scroll to the Access requests card and click Edit.
In the Set standard audience area, choose your standard audience.
Click Save.
Next, choose which entitlements in the app will be requestable by the standard audience. Click Entitlements.
Use the checkboxes on the left of the screen to select the entitlements that wil be requestable, then choose Set access requests from the bulk actions menu at the bottom of the table.
Check Make requestable to standard audience.
This control is only visible on apps that have Everyone or Specific groups set as the standard audience.
Click Submit.
That’s it! The entitlements you chose are now available for access requests to the colleagues you selected. If new colleagues join the company or the groups you selected, they will also be able to request these entitlements.
How does the standard audience work under the hood? Setting a standard audience creates an automatically generated access profile that includes the entitlements you select in this application and nothing else. This special access profile is not shown on your Access profiles page in the Admin section of ConductorOne, and users cannot request enrollment in the full profile.
Add specific resource types in an app to an access profile
The Entitlement management card an application’s details page is where you can edit the access profile assignments for specific resource types in an app, such as all groups or all roles.
Before you begin: Make sure you’ve set up the access profiles you want to add entitlements to.
Navigate to Admin > Applications. On the Managed apps tab, select an application.
Find the Entitlement management card and click to edit the Default config rules.
In the configuration rules drawer, click to turn on Enable configuration rules.
When enabled, this setting allows you to set the default configuration for the entitlements on this app. If the setting is disabled, you must configure each entitlement separately.
Select the resource types that you want your configuration rules to apply to. This list is customized to show the resource types that exist in your selected app.
Use the Access profiles dropdown to add all the the entitlements of your selected resource types to one or more access profiles.
Finally, check the box at the bottom of the screen to acknowledge that you understand that these settings will be applied to all entitlements of your selected resource types.
Click Apply.
That’s it! The new settings are applied.
Add a specific entitlement to an access profile
Use this process to assign specific entitlements in an app to one or more access profiles.
Before you begin: Make sure you’ve set up the access profiles you want to add entitlements to.
Navigate to Admin > Applications.
On the Managed apps tab, select an application and click the Entitlements tab.
Locate the entitlement, and select Edit access requests from the more actions (…) menu.
Alternatively, select multiple entitlements in the list using the checkboxes on the left side of the table, then select Set access requests from the bulk actions menu.
Use the Access profiles dropdown to add the the entitlement to one or more access profiles.
Finally, if you want to preserve these settings from being overwritten by future updates to the app-level settings, enable Lock configuration.
Click Save.
That’s it! The entitlement’s access request settings are updated. If you locked the configuration, the entitlement’s entry in the summary table now shows a lock icon in the Requests column.
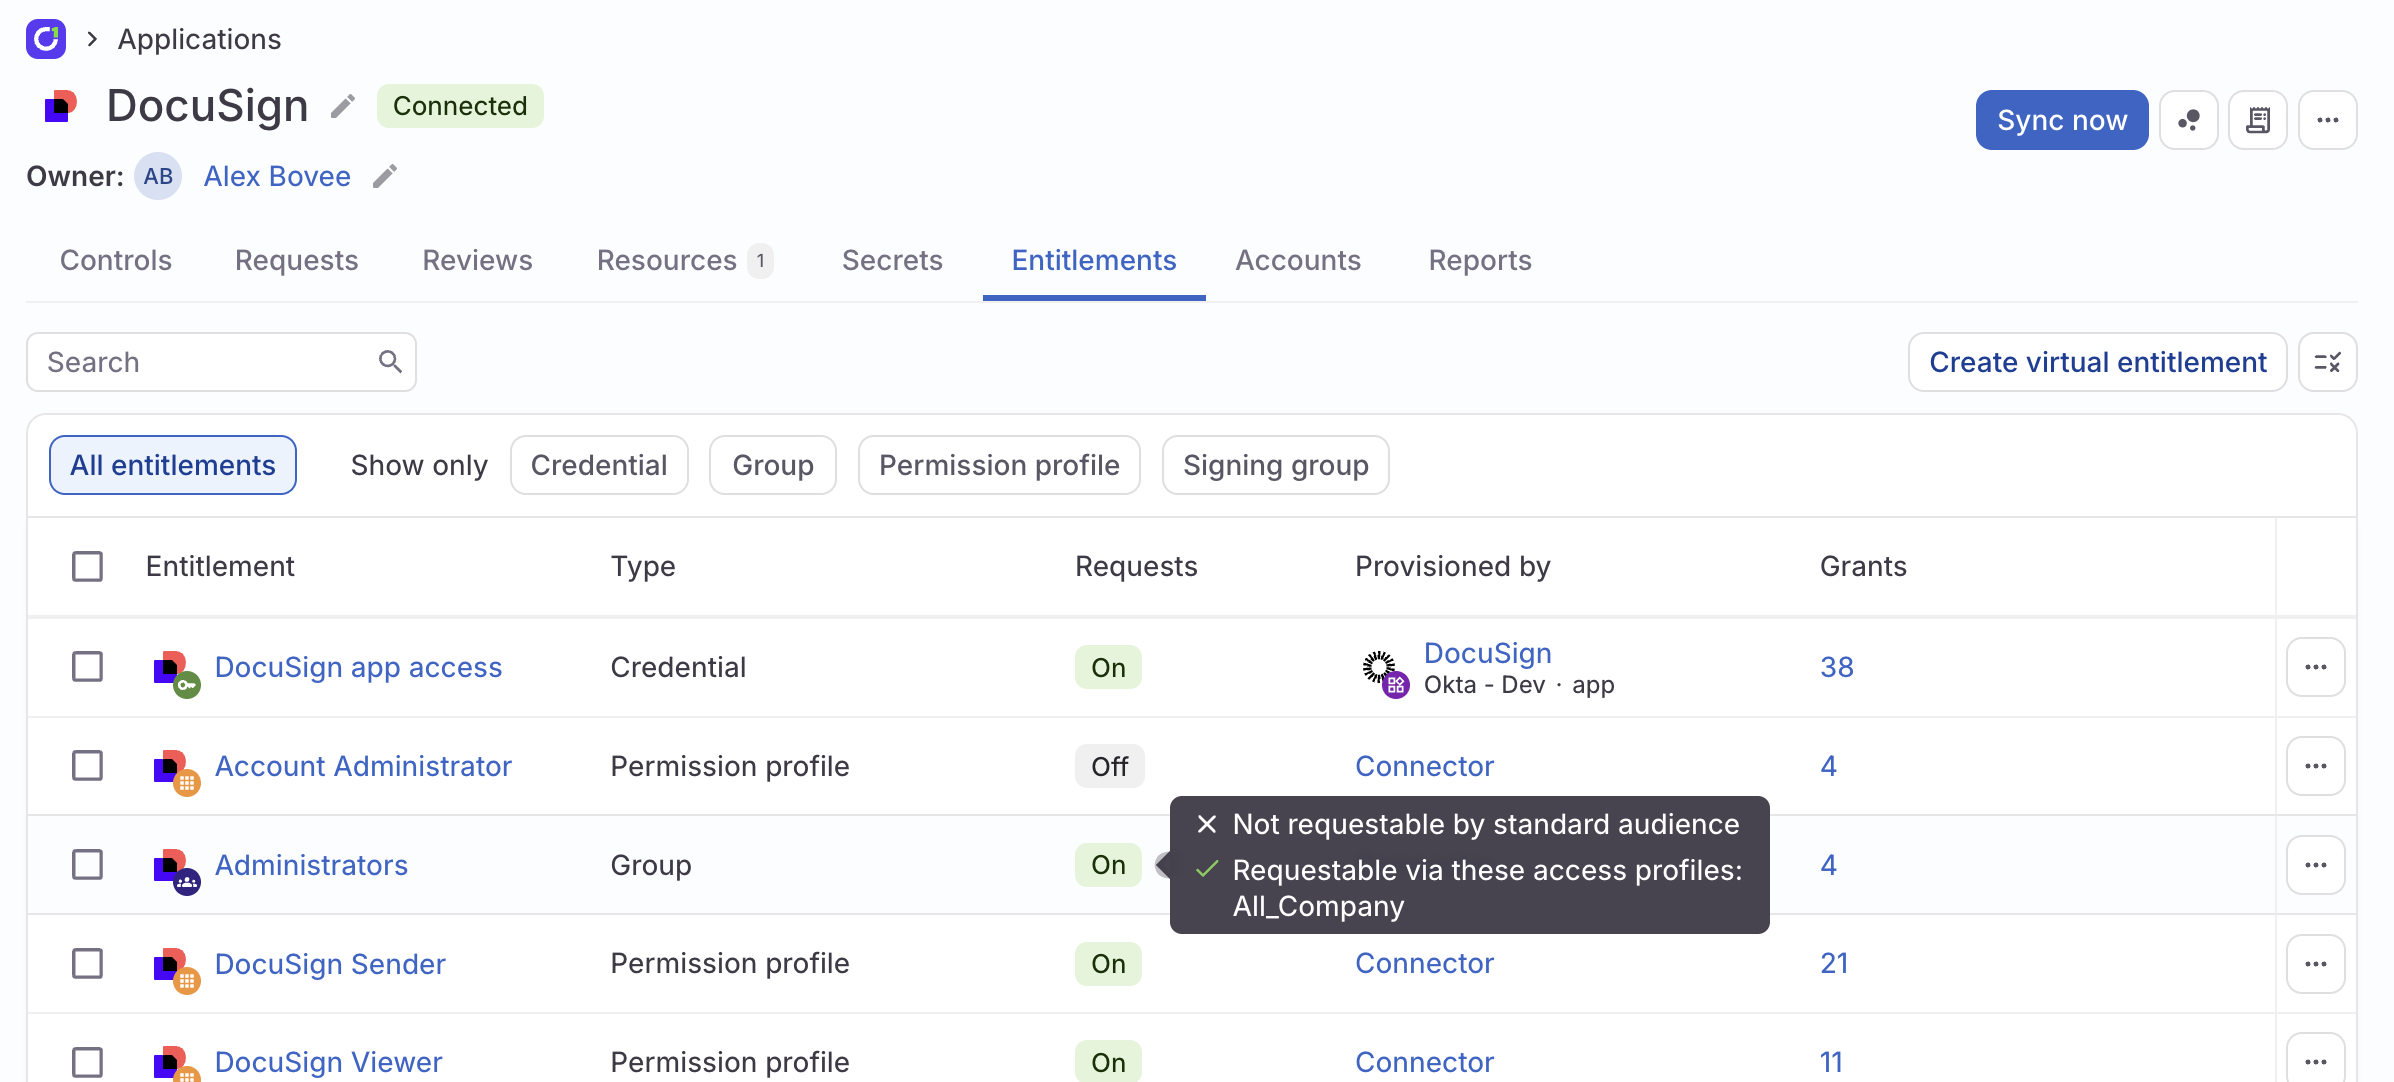
View a summary of an entitlement’s visibility
On the Entitlements tab, hover over the On chip in the Requests column to see a summary of the standard audience and access profile visibility for an entitlement.
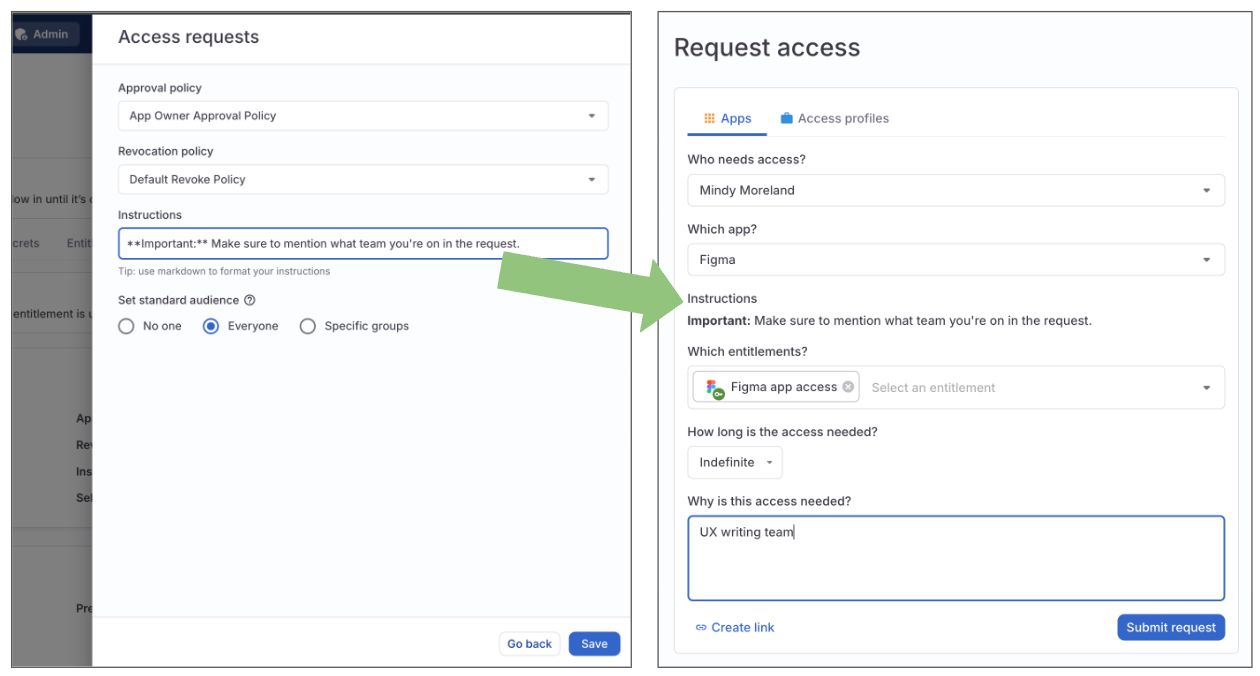
Provide instructions to requestors
You can set instructions on each application that will be shown to users when they request new access in the web UI or in Slack.
Navigate to Admin > Applications.
On the Managed apps tab, select an application.
Locate the Access requests card and click Edit.
Add app-specific request instructions to the Instructions field. You can format your instructions using Markdown to add emphasis, links, and structure.
Click Save.
That’s it! Users requesting entitlements in this app will be shown your instructions.
Set how app accounts are provisioned
Once access to an app is granted, a new app account must be provisioned. This setting is found in the Access management section of an app’s details page.
To select the provisioning method this application will use for new app accounts:
Navigate to Admin > Applications.
On the Managed apps tab, select an application.
Scroll to the Access management card and find Grant access. Click Edit.
Select the account provisioning method this application will use:
- Connector: This option uses the connector you select to automatically provision the new account. Not all connectors support account provisioningdocs/product/admin/account-provisioning/#supported-systems), and the configuration and permissions of the connector must be set up to allow provisioning where it is supported. Review the setup instructions for automatic account provisioning.
If you choose this option but automatic provisioning via the connector isn’t available, ConductorOne will fall back to manual provisioning and assign the provisioning task to the application owner.
Manual: This option prompts you to select a designated human provisioner or provisioners who will manually create the new app account. When account access is granted, a provisioning task will be assigned to the provisioner you set here. (If multiple provisioners are set, each will be assigned the same task, each will receive a notification, but just one needs to complete the task.) You also have the option to enter instructions about how to provision the new account. These instructions will be included in the provisioning task.
Delegated: This option creates a binding between two entitlements, so that when one is granted, the user automatically receives access to the second entitlement as well. This in effect delegates the provisioning method to the bound entitlement. When using this option, select the entitlement from the dropdown that will grant access to the entitlement you’re configuring.
Here’s a more in-depth explanation of how this works:
You configure provisioning on Entitlement A, choosing Delegated and selecting Entitlement B from the dropdown.
ConductorOne creates an entitlement binding for you between Entitlement B and Entitlement A. To see the binding’s details, navigate to either entitlement’s details page and click Bindings.
Entitlement B has been configured to use its connector for provisioning. When a user requests access to Entitlement B and their request is approved, the connector automatically adds access to both Entitlement B and Entitlement A to the user’s application account.
ConductorOne automatically creates the binding for you. You’ll see the proposed change to the entitlement’s bindings whenever you make a change to delegated provisioning, both when the change is automatically creating a new binding for you, and when a binding will be removed if you change the provisioning strategy from delegated to manual or connector-based.
Webhook: This option prompts you to select a webhook. Before you can use this option you must configure a webhook on the Webhooks tab of the Settings page. Whenever a user is granted access to the entitlement, the webhook will automatically fire. You can use webhooks to automate provisioning workflows for approved access, such as creating a Jira or ServiceDesk ticket or making an API call.
External ticketing: This option prompts you to select an external ticketing system, which much be configured in order to use this option (see External ticketing for instructions). ConductorOne automatically creates a helpdesk ticket in the integrated system each time account provisioning is required. ConductorOne will track the progress of the helpdesk ticket and update or close the provisioning task accordingly.
Click Save.
That’s it! When a request for a new app account is approved, the provisioning method you’ve selected will be used.
What happens if a user is granted access to an entitlement but does not yet have an account in the app? You can instruct ConductorOne to automatically make a new app account for any user who does not yet have an account but has been approved for access to an entitlement in the app. To do so, enable Ensure account on the Entitlement management card.
Set how app accounts are deprovisioned
By default, ConductorOne will attempt to infer the correct account deprovisioning process based on whatever process you’ve set up for account provisioning. You only need to proactively configure account deprovisioning if you want to use a different process from the one you’ve set up for account provisioning.
To select the deprovisioning method this application will use for revoked app accounts:
Navigate to Admin > Applications.
On the Managed apps tab, locate and click on the application you want to configure.
Scroll to the Access management card and find Revoke access. Click Edit.
Select the account deprovisioning method this application will use:
- Connector: This option uses the connector you select to automatically deprovision the account. Not all connectors support account deprovisioning, and the configuration and permissions of the connector must be set up to allow deprovisioning where it is supported. Review the setup instructions for automatic account provisioning.
If you choose this option but automatic deprovisioning via the connector isn’t available, ConductorOne will fall back to manual deprovisioning and assign the deprovisioning task to the application owner.
Manual: This option prompts you to select a designated human deprovisioner or deprovisioners who will manually deprovision the app account. When the app account is revoked, a deprovisioning task will be assigned to the deprovisioner you set here. (If multiple deprovisioners are set, each will be assigned the same task, each will receive a notification, but just one needs to complete the task.) You also have the option to enter instructions about how to deprovision this account. These instructions will be included in the deprovisioning task.
Delegated: This option creates a binding between two entitlements, so that when one is revoked, the user automatically loses access to the second entitlement as well. This in effect delegates the deprovisioning method to the bound entitlement. When using this option, select the entitlement from the dropdown that will remove access from the entitlement you’re configuring.
Here’s a more in-depth explanation of how this works:
You configure deprovisioning on Entitlement A, choosing Delegated and selecting Entitlement B from the dropdown.
ConductorOne creates an entitlement binding for you between Entitlement B and Entitlement A. To see the binding’s details, navigate to either entitlement’s details page and click Bindings.
Entitlement B has been configured to use its connector for deprovisioning. When a user’s access to Entitlement B is revoked, the connector automatically removes access to both Entitlement B and Entitlement A from the user.
ConductorOne automatically creates the binding for you. You’ll see the proposed change to the entitlement’s bindings whenever you make a change to delegated provisioning, both when the change is automatically creating a new binding for you, and when a binding will be removed if you change the provisioning strategy from delegated to manual or connector-based.
Webhook: This option prompts you to select a webhook. Before you can use this option you must configure a webhook on the Webhooks tab of the Settings page. Whenever a user’s app account is revoked, the webhook will automatically fire. You can use webhooks to automate deprovisioning workflows for revoked access, such as creating a Jira or ServiceDesk ticket or making an API call.
External ticketing: This option prompts you to select an external ticketing system, which much be configured in order to use this option (see External ticketing for instructions). ConductorOne automatically creates a helpdesk ticket in the integrated system each time deprovisioning is required. ConductorOne will track the progress of the helpdesk ticket and update or close the deprovisioning task accordingly.
If necessary, add additional steps to the deprovisioning process by clicking Add step.
When configuration is complete, click Save.
That’s it! Now when a user’s app account is revoked, it will be deprovisioned using the process you’ve set up here.
Configure access request details
Configure the approval and revocation policies, max grant duration, and emergency access settings for an app, resource type, or individual entitlement.
📋 Your access request configuration workflow
ConductorOne applies policy, grant duration, and emergency access settings using this order of precedence:
- The entitlement’s configuration
- The configuration on specific resource types
- The application’s configuration
In other words, if you specify the configuration for a specific entitlement, these settings overrule the configuration set for the application as a whole.
Because of this design, here’s how to go about configuring policy, grant duration, and emergency access settings:
If all the entitlements in the app can use the same configuration: Configure the app, do not configure individual entitlements.
If most of the entitlements in the app can use the same configuration, but there are a few special cases: Configure the app, then configure the special-case entitlements.
If none of the entitlements in the app can use the same configuration: Do not configure the app, configure each entitlement separately.
Set default access request policies for an application
Set the default approval and revocation policies that will be used for all entitlements in the application if no overruling policies are set on the resource-type or individual entitlement levels.
Navigate to Admin > Applications. On the Managed apps tab, select an application.
Find the Access requests card and click Edit.
Select the approval policy and revocation policy you want this app to default to.
Click Save.
That’s it! The new default policies are shown on the app’s details page.
Set access request settings on specific resource types
The Entitlement management card an application’s details page is where you can edit the current default access request rules for specific resource types, such as all groups or all roles in an app.
Navigate to Admin > Applications. On the Managed apps tab, select an application.
Find the Entitlement management card and click to edit the Default config rules.
In the configuration rules drawer, click to turn on Enable configuration rules.
When enabled, this setting allows you to set the default configuration for the entitlements on this app. If the setting is disabled, you must configure each entitlement separately.
Select the resource types that you want your configuration rules to apply to. This list is customized to show the resource types that exist in your selected app.
Use the Request policy dropdown to locate and select the the approval policy that will apply to the entitlements of your selected resource types.
Use the Access profiles dropdown to add the the entitlements of your selected resource types to one or more access profiles.
If a time limit should apply to grants of entitlements of your selected resource types, click to turn on Max grant duration and select the time limit.
At the end of the time limit, the user’s access will be automatically revoked. ConductorOne sends a notification to the user three business days before the access expires, so that an extension can be requested if needed. (If the access is granted for three days or fewer, no notification is sent.)
If the entitlements of your selected resource types should be available for emergency access requests, click to turn on Emergency access and select the emergency access policy that will apply to these requests.
Finally, check the box at the bottom of the screen to acknowledge that you understand that these settings will be applied to all entitlements of your selected resource types.
Click Apply.
That’s it! The new settings are applied.
Configure access request settings on an individual entitlement
Use this process to configure specific entitlements that cannot follow the app- or resource-type-level settings.
Navigate to Admin > Applications.
On the Managed apps tab, select an application and click the Entitlements tab.
Locate the entitlement, and select Edit access requests from the more actions (…) menu.
Alternatively, select multiple entitlements in the list using the checkmarks on the left side of the table, then select Set access requests from the bulk actions menu.
In the configuration drawer, you’ll see any settings that are currently applied to the entitlement. Add or edit these as necessary:
Use the Access profiles dropdown to add the the entitlements to one or more access profiles.
Use the Approval policy and Revocation policy dropdowns to locate and select the the policies that will be used for this entitlement.
If the entitlement should be available for emergency access requests, click to turn on Emergency access and select the emergency access policy that will apply to these requests.
If a time limit should apply to grants of this entitlement, click to turn on Max grant duration and select the time limit.
At the end of the time limit, the user’s access will be automatically revoked. ConductorOne sends a notification to the user three business days before the access expires, so that an extension can be requested if needed. (If the access is granted for three days or fewer, no notification is sent.)
Finally, if you want to preserve these settings from being overwritten by future updates to the app-level settings, enable Lock configuration.
Click Save.
That’s it! The entitlement’s access request settings are updated. If you locked the configuration, the entitlement’s entry in the summary table now shows a lock icon in the Requests column.
Set how an entitlement is provisioned
Once access is granted, it must be provisioned. Set the provisioning method each entitlement will use.
What happens if I don’t set provisioning for an entitlement? If you do not make any provisioning selections for an entitlement, ConductorOne will default to attempting to provision using the connector, and falling back to manual provisioning (assigned to the application owner) if connector provisioning fails.
Navigate to Admin > Applications.
On the Managed apps tab, select an application and click the Entitlements tab.
Locate the entitlement, and select Edit provisioning from the more actions (…) menu.
Alternatively, select multiple entitlements in the list using the checkmarks on the left side of the table, then select Set provisioning from the bulk actions menu.
Select the provisioning method the selected entitlement or entitlements will use:
Connector: This option uses the connector to automatically provision the access. Not all connectors support provisioning, and the configuration and permissions of the connector must be set up to allow provisioning where it is supported. If you choose this option but automatic provisioning via the connector isn’t available, ConductorOne will fall back to manual provisioning and assign the provisioning task to the application owner.
Manual: This option prompts you to select a designated human provisioner or provisioners who will manually update the user’s access. When access to the entitlement is granted, a provisioning task will be assigned to the provisioner you set here. (If multiple provisioners are set, each will be assigned the same task, each will receive a notification, but just one needs to complete the task.) You also have the option to enter instructions about how to provision this entitlement. These instructions will be included in the provisioning task.
Delegated: This option creates a binding between two entitlements, so that when one is granted, the user automatically receives access to the second entitlement as well. This in effect delegates the provisioning method to the bound entitlement. When using this option, select the entitlement from the dropdown that will grant access to the entitlement you’re configuring.
Here’s a more in-depth explanation of how this works:
You configure provisioning on Entitlement A, choosing Delegated and selecting Entitlement B from the dropdown.
ConductorOne creates an entitlement binding for you between Entitlement B and Entitlement A. To see the binding’s details, navigate to either entitlement’s details page and click Bindings.
Entitlement B has been configured to use its connector for provisioning. When a user requests access to Entitlement B and their request is approved, the connector automatically adds access to both Entitlement B and Entitlement A to the user’s application account.
ConductorOne automatically creates the binding for you. You’ll see the proposed change to the entitlement’s bindings whenever you make a change to delegated provisioning, both when the change is automatically creating a new binding for you, and when a binding will be removed if you change the provisioning strategy from delegated to manual or connector-based.
Webhook: This option prompts you to select a webhook. Before you can use this option you must configure a webhook on the Webhooks tab of the Settings page. Whenever a user is granted access to the entitlement, the webhook will automatically fire. You can use webhooks to automate provisioning workflows for approved access, such as creating a Jira or ServiceDesk ticket or making an API call.
External ticketing: This option prompts you to select an external ticketing system, which much be configured in order to use this option (see External ticketing for instructions). ConductorOne automatically creates a helpdesk ticket in the integrated system each time provisioning is required. ConductorOne will track the progress of the helpdesk ticket and update or close the provisioning task accordingly.
Click Save. The Entitlements table’s Provisioned by column updates to show your changes.
That’s it! When access to this entitlement is granted, the provisioning method you’ve selected will be used.