Create automations
Early access: This new feature is in early access while we gather feedback and fine-tune its details. Let us know if you’re eager to give it a try!
Automations in ConductorOne empower you to build custom workflows for repetitive tasks, significantly streamlining your operational processes. Automations are ideal for kicking off critical processes when an employee’s status changes, providing seamless onboarding, secure offboarding, efficient role transfers, and timely access reviews. Automations ensure consistency, reduce manual effort, and improve compliance.
Find and manage all your automations on the Automations page.
Automation structure
Here’s a sample automation’s details page:

Let’s break down the structure:
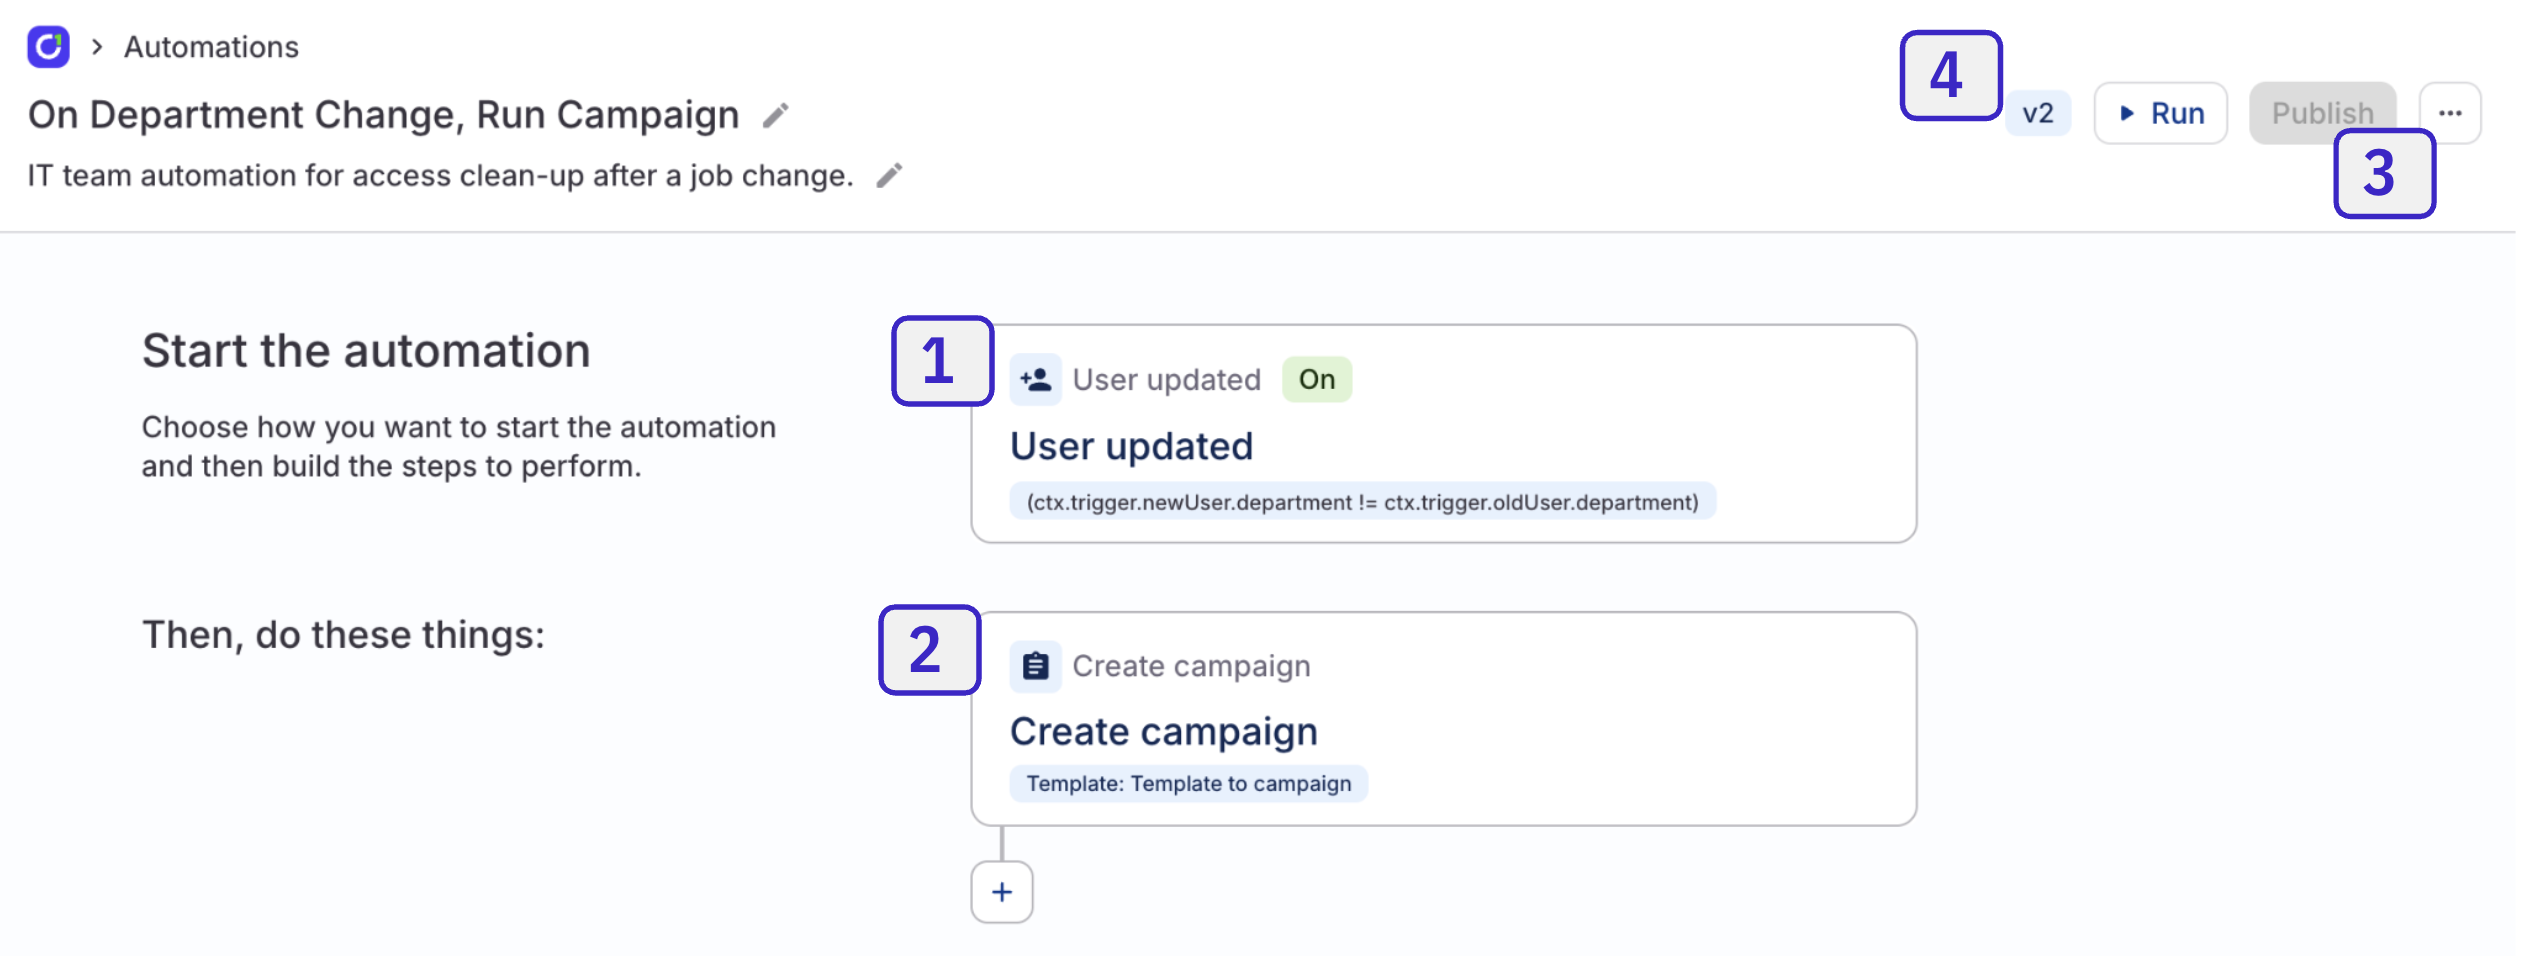
Automation trigger: This determines what causes an automation to run. This automation’s trigger is turned on, so it will run automatically. You can also manually start an automation run at any time by clicking Run at the top of the page.
Automation steps: These are the actions your automation performs. This automation has only one step, but you can add as many as you need.
Publication status: Each automation is in either a draft or published state. Here, the Publish button is greyed out to indicate that this automation is published.
Version number: Automations are versioned (this one is v2), and you can restore a previous version of an automation if necessary.
Create a new automation
A user with the Super Admin role in ConductorOne must complete this task.
Navigate to Admin > Automations and click New automation.
Give your automation a name and add a description, if desired.
Click Set automation trigger and choose the event that will trigger this automation. Refer to the automation triggers reference below for details on the available triggers.
Set the Automation toggle to On if you want to start triggering the automation when the event you’ve selected occurs as soon as the automation is published. You can also leave the toggle off for now, if desired.
Automations in their draft state do not run automatically, even if this toggle is enabled.
Click Add step and select the first step for the automation. Refer to the automation steps reference below for details on the available automation steps.
Fill out the automation step form and click Save.
Click + Add step again and repeat the process to add additional steps, as needed.
If you need to reorder the automation steps, hover over the step and use the arrow keys.
To delete a step entirely, hover over the step and click the trash can icon.
To test your automation, click Run draft at the top of the page.
You’ll be asked to provide context for the test run, and will see a panel showing the details of the execution as it proceeds.
When you’re ready, click Publish to put the automation into use.
Make sure to check on the status of the automation trigger, and turn it to On if you want to start triggering the automation when the event you’ve selected occurs.
That’s it! The automation is now ready for use. To see all executions of this automation, click the … (more actions) menu and select Show execution history.
Fine-tuning your automation
On the Advanced tab of each automation step’s setup drawer, you can add a CEL expression that instructs the automation to skip the step if a condition is met. This section also displays the step’s Step ID, which is used to reference the current step’s output in later steps.
On the Available data tab, you’ll find data gathered from previous steps in the automations, which can be used to write CEL expressions to refine or define conditions in later steps.
Editing an automation
When first published, new automations are marked v1. If you make edits to the automation, it will create a new draft version of the automation, which you can test and publish (as v2) when you’re ready.
To see all versions of the automation, click the … (more actions) menu and select Show version history. You can restore a different version of the automation from this list.
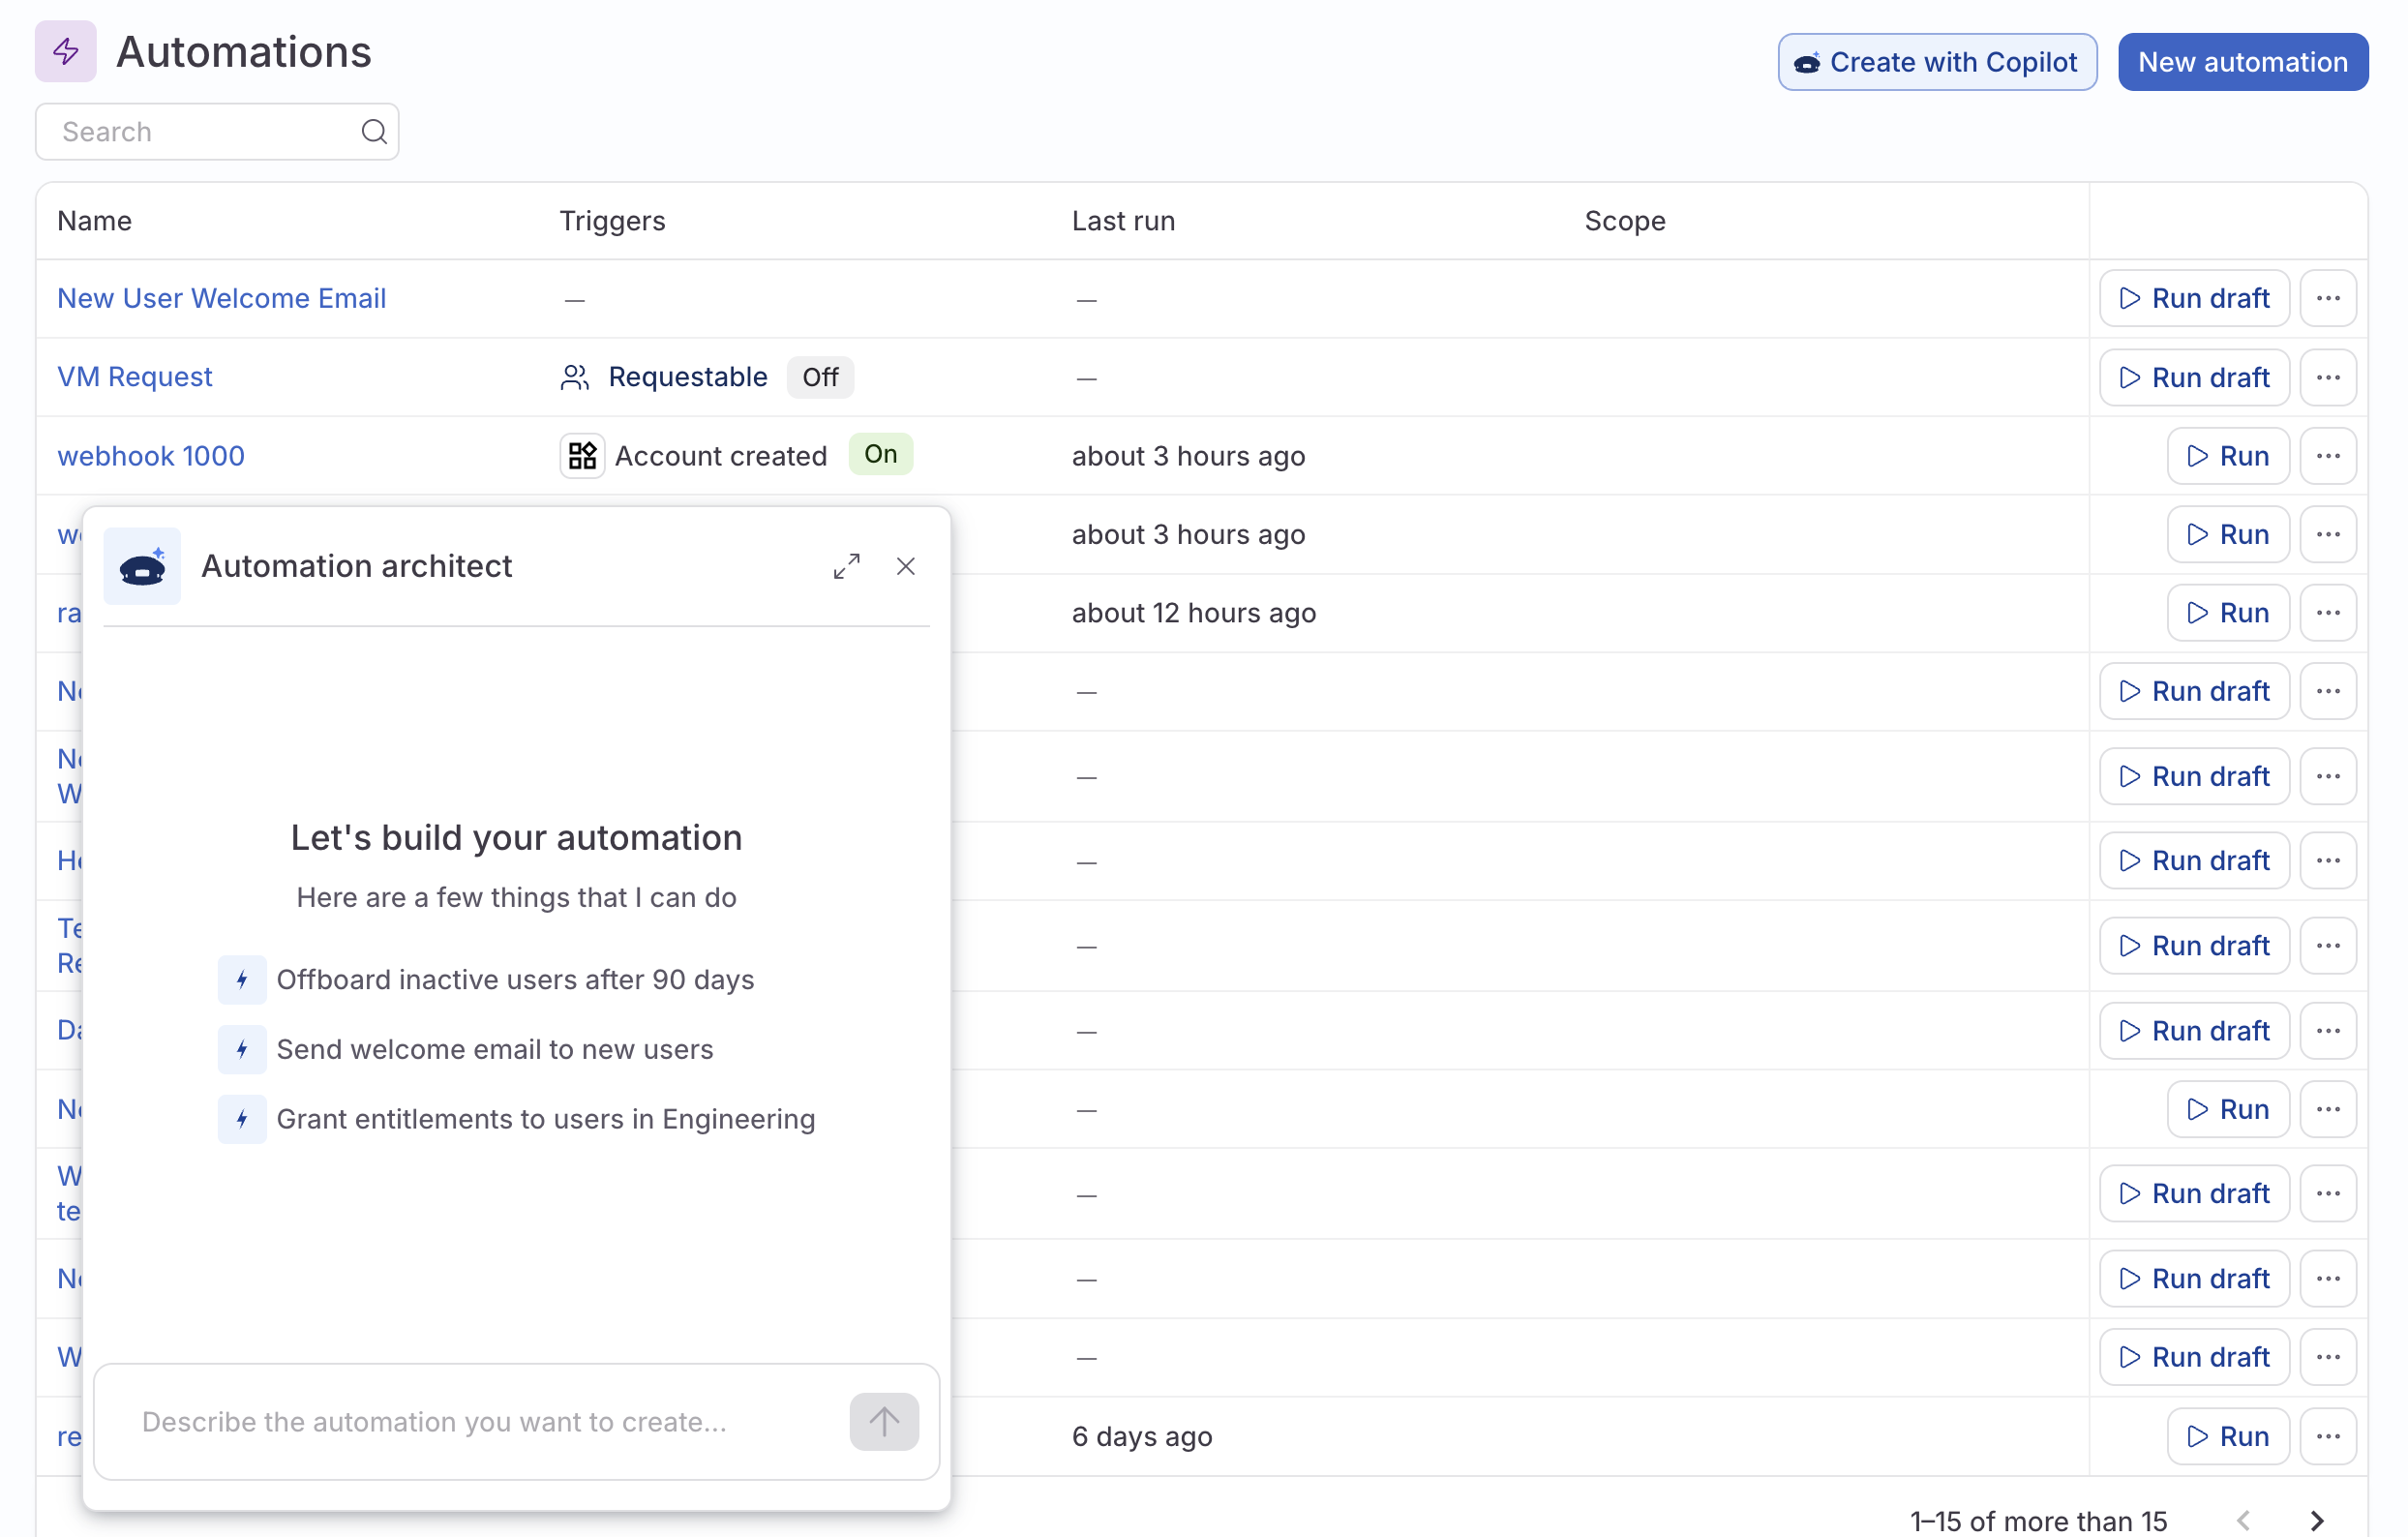
App-specific automations
A user who is an application owner with the App Admin role can create and manage app-specific automations for the apps they own.
You can create and manage automations that are scoped to a specific app on that application’s Automations tab.
To create an app-specific automation:
Navigate to Admin > Applications and click the name of an application you own.
Click Automations. Any existing app-specific automations are listed here.
Click New automation, then follow the steps in Create a new automation.
All app-specific automations are also listed on the Automations page. Only users with the Super Admin role can see and manage these automations from this page.
Unused access automations
Availability and functionality of unused access automations
Some older connectors do not support the data needed to run unused access automations. The Unused access section is not displayed on these apps’ details pages.
Be aware that while the Unused access section is displayed on all current-generation connectors’ app pages, only those connectors that report last login data (and their child apps, as relevant) can correctly track login data and use it to strategically take action on unused accounts via an unused access automation. View the list of connectors that report last login information on the connector capabilities table.
CAUTION: If an unused access automation is set up on an app whose connector does not report last login information, the automation will take action on all app accounts.
Unused access automations are tailored to help you manage unused app access. These automations fire when a user has not logged into their app account for the length of time you specify.
Create and manage unused access automations in the Unused access section of the app’s Controls tab. This section shows the number of accounts that have not been accessed in the past 30 days (click through to see the full list of these accounts on the Access explorer page), and is the home of controls for quickly creating an automation for unused access.

To set up a new unused access automation:
Locate the Unused access section of the app’s Controls tab and click Add automation.
Choose from the list of automation templates:
- Send a notification after 30 days
- Revoke access after 45 days
- Create a custom usage-based automation from scratch
The automation draft is set up for you. Click the Unused access trigger, review the details and make any adjustments.
You can choose how to treat accounts with no login activity, set how to perform the initial runs of the automation, and narrow the automation’s scope, if desired.
Click Save.
If needed, review the automation’s steps and add additional steps as desired.
When you’re ready, click Publish.
The automation is now ready for use. To see all executions of this automation, click the … (more actions) menu and select Show execution history.
That’s it! You can review and update this automation on the Unused access section of the app’s Controls tab (users with the Super Admin role can also see it on the Automations tab). You can also add additional usage-based automations to this app to further fine-tune how unused access is managed.

Automation triggers reference
Each automation can be triggered by an event such as the creation of a new application account or a change in a user or account’s status. Alternatively, you can skip adding an automation trigger and instead run the automation manually.
Trigger | Requires | Example |
---|---|---|
User updated | User attribute (Optional) Conditional expression | Trigger on a change to a user’s employment status |
Account created | App name (Optional) Conditional expression | Trigger on the creation of a new GitHub account |
Account updated | App name Account attribute (Optional) Conditional expression | Trigger on a change to the email address associated with an Okta account |
Unused access | App name Days since last login (Optional) Type of account (Optional) Whether to include accounts with no login activity (Optional) Conditions for inclusion/exclusion Cold start behavior (see below) | Trigger when a user has not logged into GitHub for 45 days |
User created | (Optional) Conditional expression | Trigger when a new user is created |
Grant found | App name Grant source Grant type Grant justification Entitlements Type of account | Trigger when a user is granted access to the OpsGenie on-call rotation |
Grant deleted | App name Grant source Grant type Grant justification Entitlements Type of account | Trigger when a user loses access to their Google Workspace account |
Incoming webhook | Authentication method (HMAC or JWT) | Trigger when an employee’s status changes to Inactive in Workday |
Cold start behavior on an unused access trigger sets whether app accounts that meet the unused access trigger’s condition when the automation is first enabled will immediately have the automation’s actions performed, or if the automation should proceed only after a delay (during which time you could, for example, alert the impacted users that their access will be removed if unused).
Automation steps reference
An automation needs at least one step, and can have as many steps as you need. You can reorder steps if needed by using the arrow controls.
Step | Requires | Example |
---|---|---|
Send email | Recipient Email title Email subject Email message | Send an email to three IT admins |
Send Slack message | Slack channel name Message | Send a Slack message to the “New employees” channel |
Wait for duration | Time to wait before proceeding | Wait 30 minutes |
Create campaign | Access review template User whose access will be reviewed | Create a new UAR campaign to review a departed user’s access |
Revoke entitlements | Target user Entitlements to revoke | Create a revoke task for AWS prod access |
Grant entitlements | Target user Entitlements to grant | Grant access to the “Engineering team” role in Jira |
Modify delegate | Target user | Remove this user as a delegate |
Remove access profiles | Target user Access profiles to unenroll from (or check the box to unenroll from all) | Unenroll the user from three key access profiles |
Modify user status | Target user New user status | Change a user’s status to Disabled in ConductorOne |
Run automation | Automation name (Optional) Context in JSON format | Trigger a run of the “Secondary Offboarding Tasks” automation |
Perform task action | Action to take on tasks User to reassign tasks to, if relevant Subject user | Assign all the user’s open tasks to the head of Security |
Run webhook | Webhook name Payload | Trigger a webhook that creates a ticket to deprovision Figma access |
Perform connector action (see below) | Connector name Action name Additional fields as determined by the connector action’s format | Lock an Active Directory account |
Create account (see below) | Connector name Creation method Additional values, depending on method | Create a new Greenhouse account |
Connector actions are custom capabilities set up on a connector. Let our Customer Success team know if you’re interested in learning more or need help setting up a connector action.
Account creation with the Custom user creation method uses the same connector-specific schema described in the automatic account provisioning documentation. If you select the From ConductorOne user creation method, ConductorOne will attempt to use the information it has about the user to create the new account.